Prep Roll District List 
The Prep Roll District List page allows users to create and maintain multiple Special Assessment billing projects. Once a district has been created, parcels can be associated with it to create the assessment rolls.
- Click the New button located at the bottom of the grid.
-
The General tab of the Prep Roll District Entry page will be displayed.
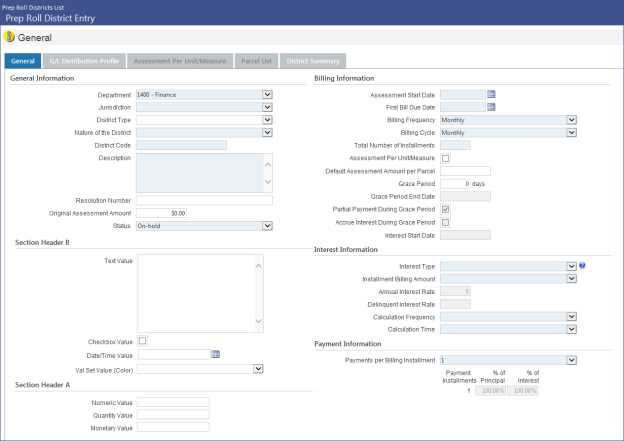
General Information
- Select a Department from the drop-down. This field is required. The departments that appear are based on what a user has been granted permissions to in Process Manager.
- Select a Jurisdiction from the drop-down. This field is required. Users must have been granted user-based security permissions for jurisdictions.
- Select a District Type from the drop-down. This is an optional field populated from validation set #532. To access the validation set, hold the CTRL key and click within the field. The validation set pop-up will appear.
-
Enter a Nature of the District. This required field allows you to define the nature of a district, i.e., to indicate whether the district is Static, Dynamic, Payment for Use, or External.
Note: The External option allows users to manually define the exact billing amount for all payment installments, instead of letting the system calculate the installment amounts automatically as it does for other Nature of District types. For more information about the External Nature of the District, click here.
- Enter a District Code in the field. This is a required field that may contain up to 16 alphanumeric characters. The code will be used to access the district throughout Special Assessments.
- Enter a Description for the district. This is a required field that may contain up to 1,024 alphanumeric characters.
- Enter a Resolution Number, if applicable.
- Enter the Original Assessment Amount.
- Select a value from the Status drop-down. This is required field. You may choose from Active or On-Hold.
Billing Information Section
- Enter an Assessment Start Date. You may type the date or place your cursor in the field and press the letter "T" on your keyboard to have the current date automatically entered. Use the up and down arrow keys to increase or decrease by day. An entry in this field is required.
- In the First Bill Due Date field, enter the date on which the first bill will be due.
- Select a Billing Frequency from the drop-down. Billing frequency indicates how often the customer will be billed for the special assessment, i.e., the interval between payments. Options are Monthly, Quarterly, Semi-Annually, and Annually. For example, if all customers are billed at the same time every year, you would select the Annually option .
-
Select a Billing Cycle. Whereas the Billing Frequency dictates how often or at what interval billing occurs, the Billing Cycle indicates the point within the interval that billing will occur. Possible options for this field are Monthly, Quarterly, Semi-Annually, or Annually. However, which of these options are available for selection depends on the Billing Frequency selected. Valid entries here will be either Monthly or the same value that was entered for Billing Frequency.
In general, if all customers associated with the special assessment are to be billed at the same time, then you would enter here the same value entered for Billing Frequency. If, however, billing is based on the month in which work is done or service is provided, then you would enter Monthly here.
For example, a special assessment may effect two neighbors equally; let's say they both had sidewalk blocks replaced, but one neighbor had the work done in March and the other in June. If Monthly is selected as the Billing Cycle, these residents would be billed in March and June respectively.
- Enter the Total Number of Installments required to pay the full assessment cost.
- Select the Assessment Per Unit/Measure. This field is disabled after the first save.
- Enter a Default Assessment Amount per Parcel if all parcels pay the same amount.
-
If applicable, enter a Grace Period. This is the number of days after the payment due date that the payment can still be fulfilled without penalty. The entered value must be between 0 and 999. When a value is entered and saved, a letter will be sent to the parcel owner including information about the grace period and payment schedule following the grace period. No bill will be sent within the grace period. This field is blank by default.
- If a Grace Period was entered, enter a Grace Period End Date, i.e., the last day on which the payment can be fulfilled and still be within the grace period.
-
Use the Partial Payment During Grace Period check box to determine whether partial payments during the grace period should be allowed. If selected, partial payment will be allowed for the selected district and all of its parcels. When this check box is cleared, partial payment will not be allowed for the district and all of its parcels.
- Use the Accrue Interest During Grace Period check box to determine whether or not interest should be accrued during the grace period. If selected, interest will be accrued during the grace period. If cleared, interest will not be accrued during the grace period.
-
The Interest Start Date field displays the interest start date based on the following:
If the Accrue Interest During Grace Period check box is cleared, then Interest Start Date = Billing Start Date + number of Grace Period days.
If the Accrue Interest During Grace Period check box is selected, then Interest Start Date = Billing Start Date.
Billing Information Section
- Select an Interest Type from the drop-down. You may choose from Simple or Compound or leave the field blank.
- In the Installment Billing Amount field, select one of the following values: Consistent, Ascending, or Descending.
- Enter the Annual Interest Rate to be applied as a percentage amount. It may contain up to four decimal places. This field is required if a selection has been made in the Interest Type field.
-
In the Delinquent Interest Rate field, enter the delinquent interest rate as a percentage value between 0 and 100.00%).
This value will be displayed in Active Roll Districts, Inquiry, Edit Listing, and the form letter. It is only editable in Prep Roll Districts.
-
Enter a Calculation Frequency. Available options are Daily, Monthly, Quarterly, Semi-Annually, or Annually.
-
Enter a Calculation Time. Available options are: Beginning of the Period or End of the Period.
If you select Beginning of the Period, interest will be calculated based on what is owed at the beginning of the period.
If End of the Period is selected, then interest will be calculated based on what is owed at the End of the Period.
Payment Information Section
-
Enter the number of Payments Per Billing Installment. This is the number of payments per billing installment. Available options are 1 to 4. The default value for this field is 1.
-
The Payment Installments table lists all the payment installments to be billed per billing installment, and for each, the text boxes with which their respective principal and interest percentages can be defined.
Payment installments are listed here in order from the first payment installment to the last. The Payment Installments column indicates the number associated with each payment installment. The number of payment installments that appear here reflect the number of payments selected via the Payments per Billing field. For example, if "1" was entered in the Payments per Billing Installment field, then one payment installment will be listed here. If "2" was entered in the Payments per billing Installment field, then two lines will appear here, and so on.
-
The % of Principal field displays the percentage of principal that will be allocated to a given payment installment. You may enter a value from 0 to 100 for each payment installment listed. The default value for this field is 100.00%.
-
The % of Interest field displays the percentage of interest that will be allocated to a given payment installment. The user may enter a value from 0 to 100 for each payment installment listed. The default value for this field is 100.00%.
User Defined Fields
If User Defined Fields were set up for Special Assessments Districts under Maintenance > new world ERP Suite > Security > User-Defined Fields, they will appear at the bottom of the page. Enter them according to the directions of your organization. For more information, see Adding User Defined Fields.
- Click Save to save the entered data, or Reset to clear the fields. Copy functionality is disabled until the district is saved.
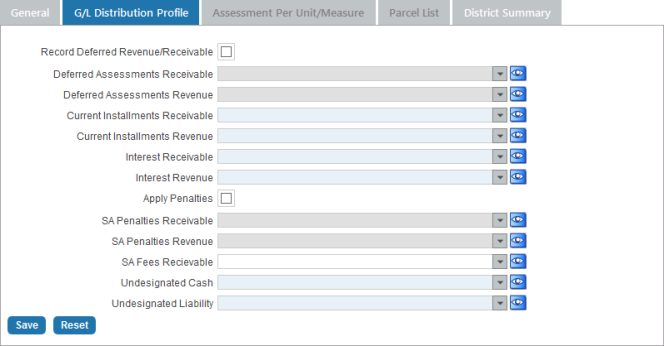
Creating the G/L Distribution Profile
The G/L Distribution Profile tab allows you to define G/L accounts for the district so the G/L transactions and journal entries will be created.
-
If the Record Deferred Revenue/Receivable check box is selected, deferred revenue/receivables will be recorded. The district will appear in the Special Assessments Delinquent Batch Entry page list box (in the Available side). When building delinquent batches, this allows users to select only those districts that are set up for recording special assessment penalties.
This field is cleared by default. It is cleared and disabled for districts with a Payment for Use Nature of District.
- Select an applicable account from the drop-downs. Use the Advanced Search icon to open a pop-up page to search for the account you want to use. The following fields are required:
- Deferred Assessments Receivable * (optional) This field is blank and disabled if the Record Deferred Revenue/Receivable check box is cleared. It is blank and editable when the check box is selected.
- Deferred Assessments Revenue * (optional) This field is now blank and disabled if the Record Deferred Revenue/Receivable check box is cleared. It is blank and editable when the check box is selected.
- Current Installments Receivable *
- Current Installments Revenue *
- Interest Receivable *
-
Interest Revenue *
-
The Apply Penalties check box allows the user to indicate whether penalty receivables and revenues should be recorded.
When the Apply Penalties check box is cleared, the two fields immediately below the check box, i.e., SA Penalties Receivable and SA Penalties Revenue, are disabled.
-
SA Penalties Receivable. This field is blank and disabled if the Apply Penalties check box is cleared. It is blank and editable when the check box is selected.
When SA Penalties Receivable is disabled, there will be no accounting entries when the Delinquent Processing Batch is validated. When posted, there will be no accounting entries or journal headers created when the delinquent batch is posted.
If SA Penalties Receivable is provided, then the receivable account will be debited and revenue account credited when an SA Delinquent Processing Batch is validated.
If an override revenue account is defined, then that account will be credited. If an override account is not defined, then the revenue account will be credited.
- SA Penalties Revenue
- SA Fees Receivable * - reserved for future development
- Undesignated Cash *
- Undesignated Liability *
* The selections made in these fields must be for the same fund.
- When complete, click Save.
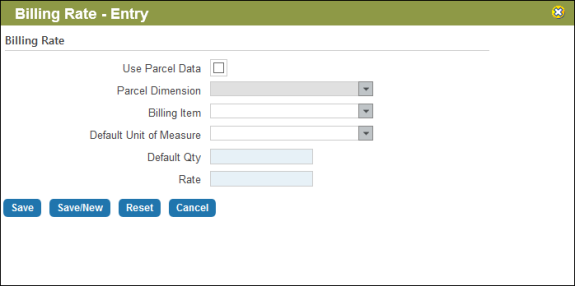
Entering Assessment Per Unit/Measure Information
The Assessment Per Unit/Measure tab provides the ability to define per unit/measure billing rates so charges can be made based on one or many units of measure.
Note: The Assessment Per Unit/Measure tab is the third tab located on the Special Assessments District Entry page. It is enabled when the corresponding check box has been selected on the General tab and saved.
-
Click the New button located at the bottom of the grid. The Billing Rate - Entry pop-up will display.
-
Select the Use Parcel Data check box to create an assessment based on parcel data opposed to unit data. If you would like create an assessment based on unit data, leave this check box unchecked.
If this check box is selected, the Parcel Dimension field is enabled and the Billing Item field is disabled. If the check box is cleared, the opposite is true, i.e., the Parcel Dimension field is disabled and the Billing Item field enabled.
-
If the Use Parcel Data check box is selected, use the Parcel Dimension field to define the parcel dimension being assessed; values for this field are based on the Community Development Parcel Dimension Type validation set, #150. This optional field is blank by default. This field is only enabled when the Use Parcel Data check box is selected.
-
The Billing Item field allows you to select the billing item on which the assessment is based. This field is enabled when the Use Parcel Data check box is cleared; it is disabled when the check box is selected.
- Enter a Default Unit of Measure. This field's drop-down list includes all the units of measurement that have been defined for the Unit of Measure validation set in NW ERP Maintenance.
- Enter the Default Qty. This is an optional field that will be set to zero by default.
- Enter the Rate. This is a required field that will accommodate up to five decimal places.
- Click Save to save the entered data, Save/New to save the entered information and proceed to a new assessment per unit entry page, or Reset to clear the fields.
Parcels may be entered on new and existing districts from the Parcel Entry tab. To access the tab, do the following:
- On the Prep Roll District page, open a district by clicking on its District Code hyperlink (in the District Code column).
- The Prep Roll District Entry page will open. Click the Parcel List tab.
- The Parcel List tab will display. Click the New button located at the bottom of the tab.
-
The Parcel Entry page will open.

Property Information
- The District Code field will be filled by default based on the district you are working in. This is not an editable field.
-
The Nature of District field displays the Nature of the District value previously selected via the General tab of the Prep Roll District Entry page. It indicates the nature of the district, i.e., whether the district is Static, Dynamic, or Payment for Use.
Note: If Static is selected, new parcel accounts cannot be added if the roll is locked. If Dynamic is selected, new parcel accounts can be added even after the roll is locked.
This field is for informational purposes only and cannot here be modified.
- The Jurisdiction field will also be filled by default with the jurisdiction selected on the general entry tab. This is not an editable field.
- Select a Parcel from the drop-down. Selection options will be populated with parcels within the chosen jurisdiction. You may also click the magnifying glass icon to open the Parcel Prompt search for assistance in locating a parcel. Once chosen, the Owner's Name, Parcel Address, and Billing Address fields will be filled by default. This information is not editable on this screen.
- The Parcel Legal Description, Owner's Name, Parcel Address, and Billing Address fields are provided for informational purposes only. They cannot be modified here.
- The Active check box is selected by default. Clear the check box if the parcel is inactive in the district. Once the check box is cleared, the Inactive Reason field is required.
- If the Active check box has been cleared, select an Inactive Reason from the drop-down. The options in the list are populated from validation set #534.
Billing Information
The billing information section is pre-filled with information that was set up for the district. Values for most of these fields are pulled from information entered on the General tab, while Assessment Amount is either the amount defaulted in, manually entered, or the total of all billing items entered on the Assessment Per Unit tab. The values entered in these fields may be adjusted as needed.
-
The Total Number of Installments field displays the total number of installments as entered via the General tab of the Prep Roll District Entry page. When adding a parcel (Add mode), this value cannot be modified on this page.
- If the Exempt Delinquent Charges check box is selected, delinquent charges will be exempted. If cleared, delinquent charges will not be exempted.
Per Unit/Measure Rates
The Per Unit Rates section displays the billing items entered on the Assessment Per Unit tab. All of the fields in this section are pre-populated with rate information. Only the amount in the Quantity field(s) may be edited. If per unit quantities are updated, this change will be reflected in the Assessment Amount.
To continue to either the previous parcel, next parcel, or jump to the beginning or end of the list of parcels, use the navigation control located at the top of the tab next to Property Information.

Interest Information
Related interest information is displayed at the bottom of the tab. These fields are populated with values entered in the General tab.
Note: You cannot delete a district with an Active status. If you attempt to delete an active district, an error message will be displayed.
- Click on the district you would like to delete.
- Click the Delete button located at the bottom of the grid.
- A pop-up will appear for you to confirm the deletion. Click OK. If you do not want to delete, click Cancel.
By default the grid shows all districts with a Pending or Active Status. You can also choose to show districts with a Closed or Inactive status or any combination of these four statuses.
- Click the Show Search icon at the top right of the screen.
- Make your selections from the Pending, Active, Closed, and Canceled check boxes.
- Click Search. Results will be displayed in the grid.
- Click Hide Search to access the buttons at the bottom of the grid.
When an existing Special Assessment district is copied to create a new one, all fields will be copied over and the status will be set to pending.
- Click the District Code hyperlink for the district you want to copy.
- The Special Assessments District Entry page will be displayed.
- Click the Copy button at the bottom of the screen.
- The Copy Special Assessments District pop-up will be displayed.
- Enter a new District Code for the copied district. This is a required field. It may contain up to 16 alphanumeric characters.
- Enter a Description. This is a required field.
- Click OK.
- You will now be in the new district. Click the breadcrumb link for the Special Assessments Districts List to return to that page.
- The newly copied district will appear at the bottom of the grid.
-
It will be set to Pending status and all fields will be editable. See Editing a District below for more information.
Note: When copying an external district, the Assessment Per Unit/Measure check box will be cleared and disabled. Also, the Installment Schedule check box will display, allowing the user to choose whether or not to copy the installment schedule values from the original district to the newly created district. The Installment Schedule check box is enabled for external districts only, and then only when the Parcels check box is selected on the Copy District pop-up page.
- To edit a district after it has been created, click its hyperlink in the District Code column on the grid.
- The Special Assessments District Entry page will be displayed.
- Make any necessary changes and click Save.
- To return to the Special Assessments Districts List page, click the breadcrumb link at the top of the page.
- To add documents to a district, click the document icon
 on the right side of the Special Assessments Districts List grid. The Documents pop-up will appear.
- Click Add, then click either Upload to add a document from your computer or Add Link to add a remote document (skip to step 6 for instructions on adding a link).
- If Upload is clicked, the Upload Files pop-up will be displayed. You may drag and drop files into the window or click anywhere in the box to open up a Windows file dialog to select the files you'd like to upload.
- Once the file is successfully uploaded, you may click to close the pop-up.
- The new document will appear in the list. You may close the pop-up window to return to the District List page.
- If Add a Link is clicked, the Add Remote Document pop-up will be displayed.
- Enter a Description for the linked document.
- Enter the URL web address for the linked document.
- Select the Add More check box if you would like to add an additional link after this one.
- Click Add.
- Once the link is added, you may close the pop-up. The linked file(s) will be displayed in the list. You may close the pop-up to return to the District List page.
- To add notes to a district, click the notes icon
 on the right side of the grid. The Notes screen will be displayed.
- Click Add. The Add Note pop-up will be displayed
- Enter a Subject for the note.
- Enter a Message.
- Select Notifications and Users. These are the users that will be able to read the note.
- Enter an Activity Date if applicable.
- Click Save.
- The new note will appear in the list. You can continue to add additional notes if needed.
See Also